


Turn a straightforward mathematical challenge into an exciting, active learning adventure
When students draw on their mathematical powers, you can make almost anything into an engaging task, says NRICH director Ems Lord…

- by Ems Lord

One of the most powerful ways to nurture young mathematicians is to encourage them to use and develop their mathematical powers (Mason, 2007).
These powers can be harnessed to move the focus from teacher to student, encouraging your pupils to take more responsibility for their own learning, and include, for example:
- imagining and expressing
- specialising and generalising
- conjecturing and convincing
- organising and categorising
Before focusing on your students’ mathematical powers, though, it can be incredibly revealing to try to become more aware about how we use our own.
Choose a suitable mathematical problem, perhaps one from NRICH’s Thinking Mathematically collection. Have a go at your chosen problem, then reflect upon which mathematical powers you drew upon at different stages during the problem-solving process.
Did you tend to favour making conjectures early on? Or were you more focused on organising your work? Perhaps you prefer to draw diagrams? Reflect on your strongest mathematical powers and how those strengths might influence your classroom teaching. Which of your powers might you want to develop further?
Conjecture and convince
You can develop the mathematical powers of your students in your lessons by recognising and highlighting the different ones that are required when tackling a range of problems. Although students might draw upon all their mathematical powers at various points during a lesson, some activities offer opportunities to develop particular pairs of powers.
Tilted Squares, for example, starts by offering your students the chance to develop their conjecturing and convincing skills, and will also guide them towards discovering another well-known mathematical theorem.
Most of your students will be familiar with finding the areas of squares when they are in their usual orientation. So, we could start by asking ‘What is the area of a 4 by 4 square?’ and ‘How about 5 by 5?’, ‘6 by 6?’, ’10 by 10?’…

Answers should come easily until we ask ‘But what if we had to work out the area of a tilted square?’ Show students this diagram of a tilted square and ask ‘How might we work out the area of this square?’ Allow some thinking time before collecting initial ideas on the board.

Possible feedback might include suggestions that the base is 3cm long and that the area must therefore be 9cm2. Perhaps a student might suggest measuring the length with a ruler and then squaring the result.
John Mason recommends asking students to convince themselves, before convincing their friends, before finally convincing a sceptic, or the rest of the class (Mason, 2007).
This might be a good opportunity to ask students to do this, so that they learn to develop, test and refine their arguments as they go along.
Walk around the classroom and listen to the discussions. Look out for any students who suggest splitting up the square into right-angled triangles and squares and adding the areas, or drawing a 4 by 4 square around the tilted square, then working out the area of the larger square (16 cm2) and subtracting the area of the four unwanted right-angled triangles (6 cm2) to work out the area of the tilted square (10 cm2).
Further powers
Once students have shared their strategies and agreed on the area, mention how good it would be if they could work out the areas of tilted squares as quickly as they calculated the areas of the ‘normal’ squares.
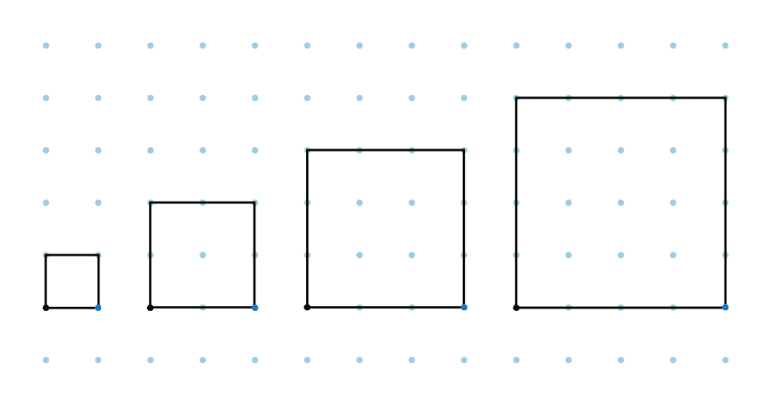
This is an ideal opportunity for some collaborative work. Suggest that the job of finding the areas of ‘slightly tilted’ squares could be shared out, and ask different groups to work out the areas of squares with a base that goes 4 along and 1 up, 5 along and 1 up, 6 along and 1 up… 10 along and 1 up…
Allow each group time to find the area of their squares before bringing them back together to share their findings. They should notice that all the areas are 1 more than square numbers and this should suggest a quick and efficient way to calculate areas of ‘slightly tilted’ squares.
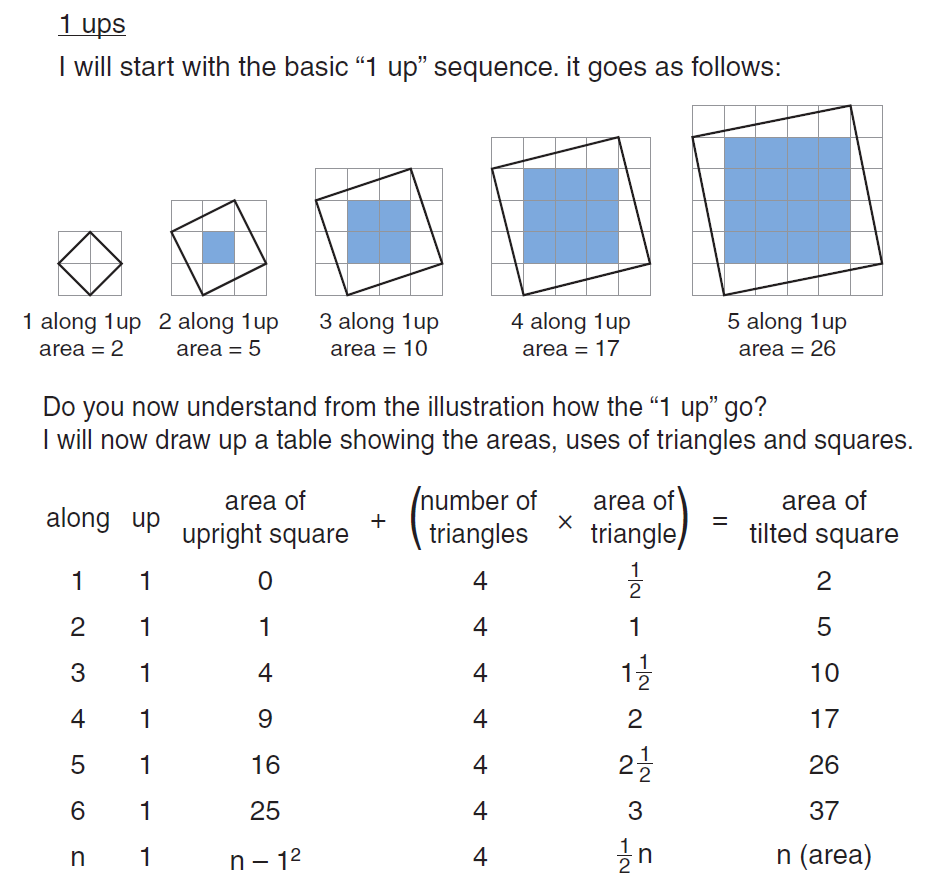
In the student’s work shown here, there is clear evidence of someone using a range of mathematical powers. The student has specialised when drawing different tilted squares, then organised and classified when listing the results in a table, and generalised in the final row of the table.
Introducing Pythagoras
Tilted Squares is also an excellent vehicle for introducing Pythagoras’ Theorem questions. Rather than presenting the theorem as a fait accompli, students can discover the relationship between the squares of the sides of right-angled triangles by generalising their findings. But can they prove their results?
Sketch the following tilted square within a square:
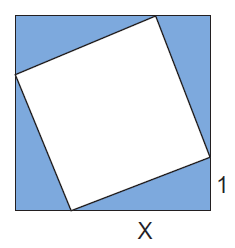
Ask your students if they can work out the area of the tilted square using the ‘boxing in’ method described earlier.
By subtracting the area of the four shaded triangles from the area of the larger square, they can arrive at the area of the tilted square: Area of larger square – area of four shaded triangles = (x+1)2 – 4(½ x) = x2 + 2x + 1 – 2x = x2 + 12
Encourage your students to next consider squares with different tilts, such as 2, 3, 4 or 5 up. This may again offer an opportunity for collaborative work, with different groups taking on squares of different tilts, working out their areas and trying to generalise their results.
Here is an example of how a student recorded her results after working on 3 steps up and 4 steps up tilted squares:
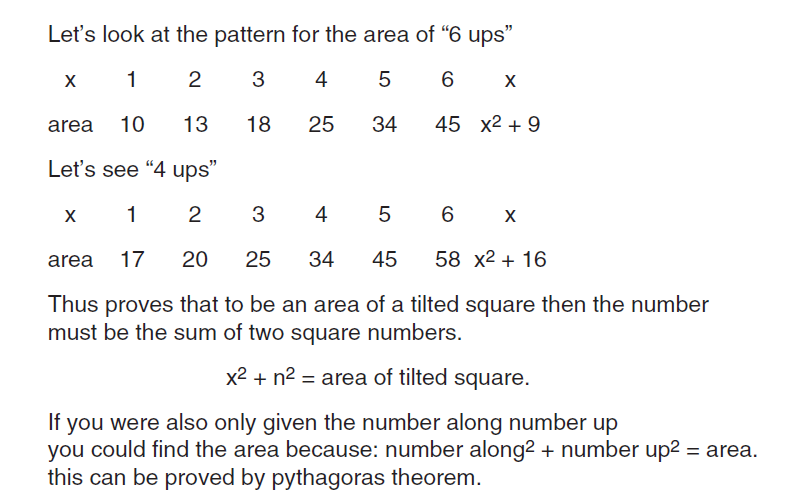
She appears to have convinced herself that her results prove Pythagoras’ Theorem, but we may require a more rigorous justification…
Draw a tilted square with an x along, y up tilt, and ask your students if they can work out the area of this general tilted square. Again, the ‘boxing-in’ method can be used: Area of larger square – area of four shaded triangles = (x+y)2 – 2xy = x2 + 2xy + y2 – 2xy = x2 + y2
Students will now have discovered and proved Pythagoras’ Theorem!
This article was adapted from a chapter by Ems Lord which features in Approaches to Learning and Teaching Mathematics – A Toolkit for International Teachers by Charlie Gilderdale, Alison Kiddle, Ems Lord, Becky Warren and Fran Watson. The newly released book is available from Cambridge University Press here.