


How to teach forces with confidence in primary science

It can seem hard to know where to start with these mysterious invisible concepts, but Beth Budden is here to help…

- by Beth Budden

Forces are, by nature, hard to understand; often only their effects can be seen, while the force itself remains hidden. In addition, forces are with us all day, every day yet we hardly ever notice their presence, which can make it even harder to extricate them from our everyday experiences.
All of this means that teaching forces can feel like a walk into wonderland as we try to elucidate things that are on the one hand invisible and seemingly incomprehensible, yet at the same time obvious and everywhere.
With all this mystery and intrigue, it can seem hard to know where to start. However, clearing up some basic misconceptions and clarifying a few straightforward concepts can help you to teach forces with more confidence.
What are forces?
It’s always a good idea to plan your explanations of difficult concepts beforehand, just like you plan other parts of the lesson. This will ensure you teach difficult concepts accurately without getting into a knot on the spot.
Firstly, it’s important to establish what forces are. Establish this from the start:
A force is a process that causes a change in an object’s shape, speed or direction
This means that we usually see the effect of a force, rather than the force itself. A nice thing to do is give children a pair of cardboard glasses each and call them ‘forces goggles.’ With these on, we can think differently and try to see (or visualise) the invisible!
There are a number of key concepts that are important for teachers of forces to understand and, in turn, make clear to children. Firstly, establish this:
A force is acting on an object when it changes its shape, speed or direction
The second concept to make clear is this:
There are two types of forces: contact forces, like pushes and pulls, and forces acting at a distance, like gravity
Importantly, more than one force can act on an object, so it can be quite difficult to unravel which force is at work. However, the one fact we can be sure of is this:
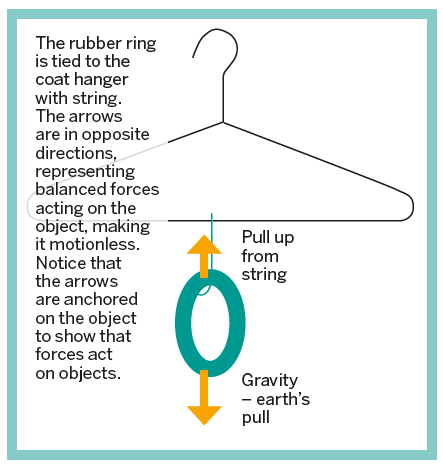
When an object is still, the forces acting on that object are balanced and equal
Practical activities
Before thinking about which forces are acting, the first step is to isolate the object. For example, when thinking about a cup on a table, we need to think about the cup itself, rather than ‘the cup on a table’.
This is a difficult concept to convey, but will help to separate objects from others they are in contact with, so the specific forces in action become clear.
Give children paper arrows and ask them to stick them onto an object to show the direction of forces acting on it. Importantly, ensure they stick these arrows to the actual object, rather than floating above.
Alternatively, if you’re using drawings, encourage children to draw arrows in contact with the objects. The important thing is to avoid the arrows floating beside the object, because forces act on, not beside, objects.
This is a small but important point that will help to avoid misconceptions.
When teaching about a force like gravity, establish the rule that a force is acting on an object when it changes shape, speed or direction and that they are balanced when objects are still.
Next, establish that gravity is a force that acts at a distance. Explain that gravity is a force by which all objects with mass are attracted to each other, creating a pull.
However, objects with a larger mass have a stronger pull on objects with a smaller mass and this is why objects on earth fall towards the ground – the massive object that we live on.
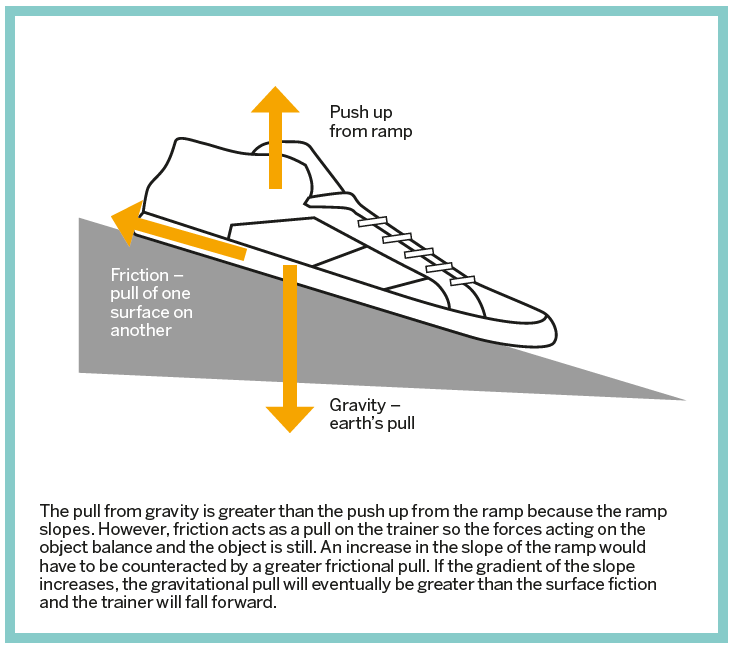
As you introduce pupils to different types of forces, like friction or air resistance, try giving them more complex situations. Set up scenarios like the below around your classroom and give children lots of stick-on arrows. Ask them to identify and explain the forces acting on objects.
Common errors to avoid
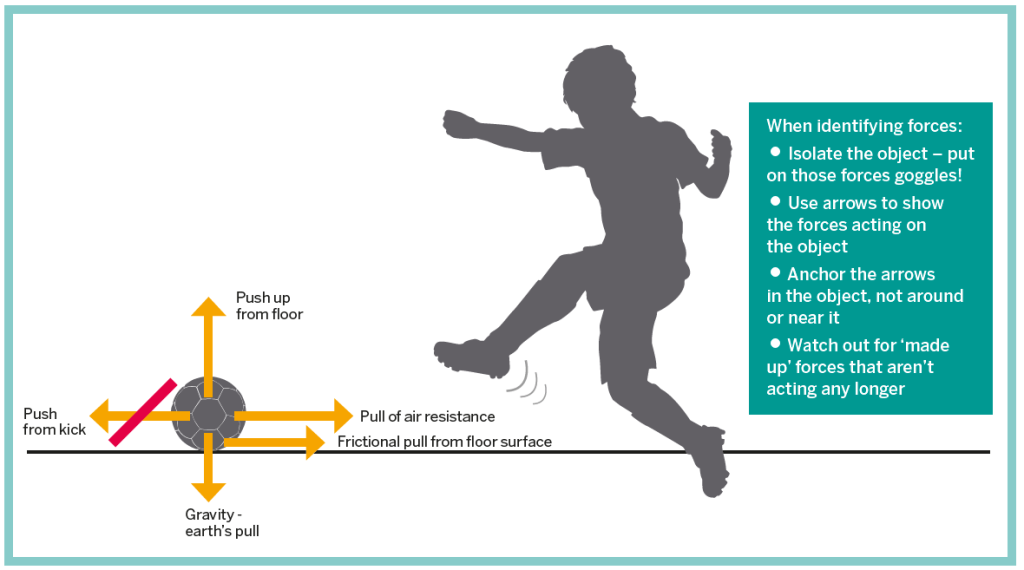
A common mistake in the above ball-kicking scenario is to say a push is acting on the ball. The kick was a push acting on the ball (it changed the ball’s shape, speed or direction).
Once the touch ceased, so did the force acting on the ball. The ball stays on the ground because of the pull of the earth’s gravity, but it doesn’t fall through the floor because of the push up from the floor.
The ball eventually slows down because friction and air resistance act on the ball (changing the ball’s shape, speed or direction).
If there was no friction or air resistance the ball would carry on and on, not because a push is acting on the ball, but because no other force is causing a change to shape, speed or direction.
This is the same if you throw a ball up in the air. Once it’s in mid-air there is no longer a push up. The ball will keep going up until gravity and air resistance change its shape, speed or direction, then the ball begins to fall back down.
Beth Budden is a teacher in south London and fellow of the Primary Science Teaching Trust. Find her on her website at bethbuddenteacher.wordpress.com and follow her on Twitter at @bethbudden.