
Concept maps – How I use them to assess knowledge
Use this tried and tested approach, using hexagons and concept maps to assess knowledge in history, geography and RE

- by Karl McGrath
This concept maps approach first came about when I had come to the end of a history unit on the Anglo-Saxons.
I was struggling to decide how I was going to assess what the children had learned.
I remembered that in the past I had used concept maps within lessons, and in my lesson observation for my current role.
Concept maps are fantastic for pulling out connections between ideas, however, I remembered a training session on ‘solo taxonomy’ that had used hexagons to show content links through shape tessellation.
My children were also already used to using hexagons to make links through the work we’ve done with Alex Bedford and the CUSP curriculum, so I knew this was the way to go!
Knowledge assessment
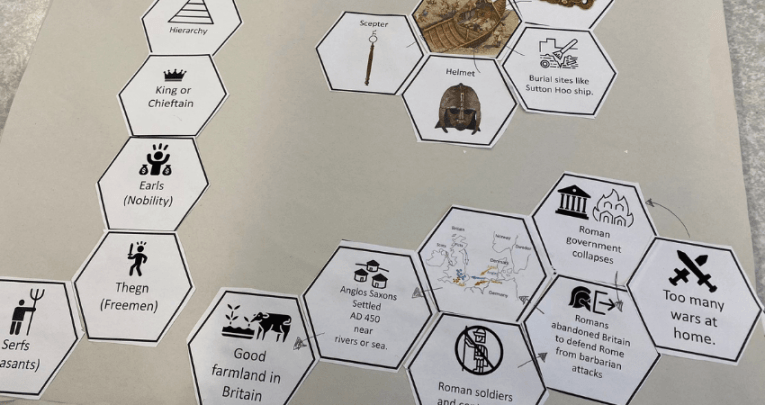
First, you will need to decide what knowledge you are trying to assess and connect.
For me, this was keywords, icons I had used, pictures, and questions that the children asked during lessons.
This was fairly simple and I added these to the hexagons – feel free to use this template that I put together for the Anglo-Saxon lesson: tinyurl.com/tp-HistoryHexagons
Hexagons
This is where things can get messy.
You need to decide whether the age and sensibility of the class allows for them to cut out the hexagons themselves.
As I teach Year 5, I felt they were capable.
It was also a great opportunity for the children to discuss and interact with each ‘knowledge hexagon’.
Although I’m assessing their individual knowledge, it was important for the children to work in pairs as their discussion aided in knowledge retrieval.
But you can always cut them out yourself, beforehand.
Grouping concepts
Next, we move on to sorting and grouping of the concepts.
Pupils will have started to discuss the concepts they can see laid out in front of them, but now they need to group them.
First, they need to put any hexagons that have a term or idea that they don’t understand to one side.
Pupils should lay the rest of the hexagons on the sheet of paper and arrange them in a way that makes sense to them.
Explain and justify connections
Then the children will need to put any hexagons that they think are related close together.
It’s important to leave a small space between them, because the children will need to write in this space.
The beauty of this concept is that there are no real right or wrong answers.
Normally, as long as the children can explain and justify their connections, within reason, they’ll be able to arrange the hexagons as they see fit.
Related terms
When pupils are happy with the placement of their hexagons, they should then stick them down.
Next, get them to draw lines between the terms that are related and write next to each line the reason why they believe them to be related.
Finally, look at the hexagons that were put aside; if there are any that could now be related, can they be added?
I always add a few blank hexagons for the children to generate other ideas that you may not have thought of.
Karl McGrath is the curriculum task design lead at Benton Park Primary school, Newcastle upon Tyne. Follow Karl onTwitter @MRMICT and see more of his work at pedabytes.com